 |
| ShopProject 1 -- The "Bear Chair" |
This is the first in a series of blog entries I'm calling "ShopProject." Each will focus on a single project that I've completed and describe in detail how I went about accomplishing the job. This first one is a woodworking project - the building of a child's rocking chair in the shape of an embracing teddy bear.
I built the first of these chairs around 30 years ago. The plans were published by Rockler Woodworking, a company that provides tools and supplies for woodworkers. They have around fifty stores nationwide as well as a robust Web-based retail presence. When I decided a couple years ago to build another rocking chair, I was disappointed to find that Rockler no longer listed these plans in their catalog. I called the company and they confirmed that these plans were no longer available. Not to be deterred, I went on line to search for an available set of plans and located the set shown here.
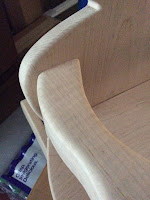
In this first pictorial drawing, you can see the overall assembly of this project. Note that the arms are double thickness; all other major pieces are of 3/4 inch thickness, although I have made this chair using 1" thick stock. Below the assembly drawing is the Bill of Materials.
Over the years, I have built this project using ash, cherry, and maple. The most recent version, the one I'm describing here, is made using 1" thick curly maple. The 1" thick stock requires a few accommodations in the plan, and the curly maple demanded some special finishing to bring out its most spectacular appearance.
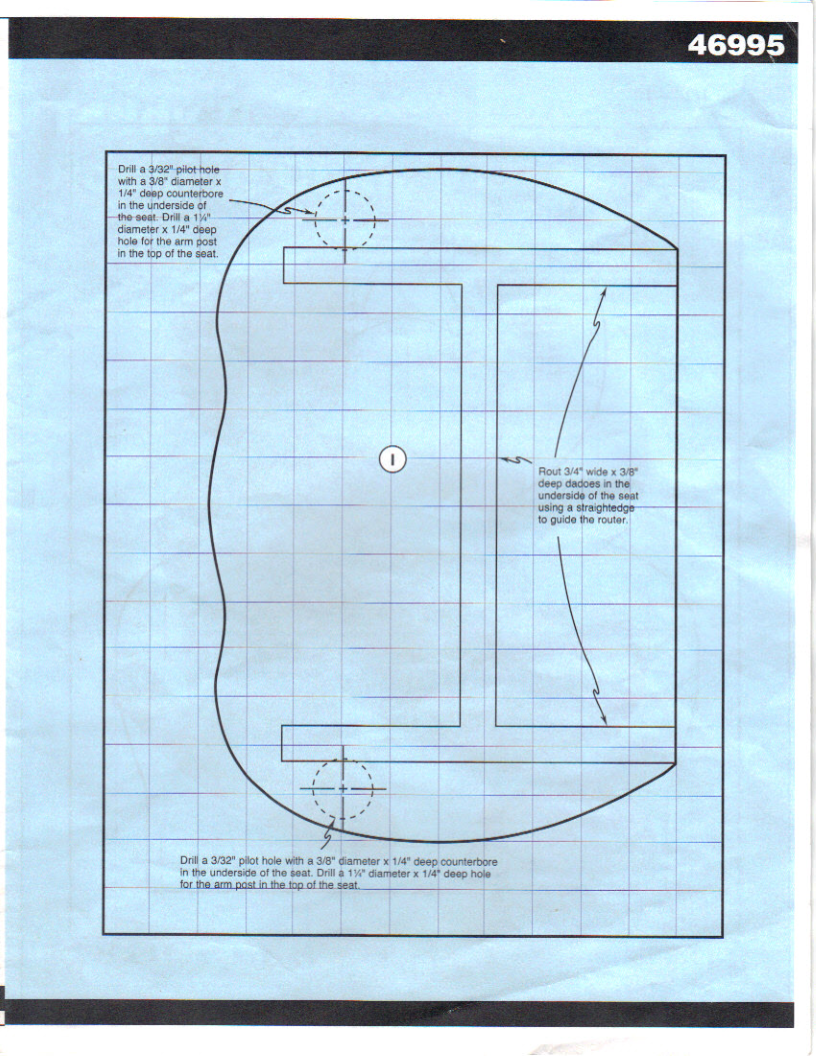
The next page of the plan describes the individual components of the chair, along with the recommended procedure for crafting each piece. These instructions are well thought out and should be heeded. For example, the underside of the seat has 3/8" deep routed dadoes into which the rockers and cross brace are fastened. The instructions have you rout these channels while you still have enough stock to attach a guide for your router. Only after you cut these dadoes do you cut out the seat. If you cut out the seat prematurely, guiding the router becomes much more of a challenge.
 |
| The step-by-step instructions are carefully planned and meant to be followed. |
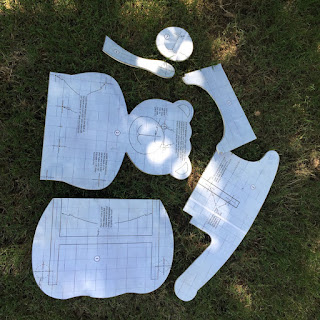
The remaining pages of the plan provide scaled images of the pieces drawn to 1/2 scale. To enlarge these to full scale, you may either redraw them on a 1" square grid or enlarge them to the point at which the grid lines in the plan are 1" apart.
Preparing the Templates
Whenever I plan to use a design more than once, I begin by creating rigid templates of the individual pieces. I do this by blowing up the plan to full size. Then I glue or paste the paper plan to a piece of thin plywood or Masonite™. I cut this out on a band saw, being extremely careful to follow the edge line as closely as possible. Once this is done, I have a pattern I can use multiple times by merely tracing the outline onto a piece of stock that I intend to build with. I also drill all the pre-positioned holes with a drill large enough to permit a pencil or scribe to be inserted to mark its position on the stock I'm working with.
 |
| The templates I use to mark the lumber I'm working with |
Marking the Construction Material
I carefully lay out the templates on my stock attempting to use the material in the most efficient manner. In the case of large pieces, I may have to glue multiple smaller pieces together before tracing the pattern. In these cases, I select my stock to ensure that the grain and color are similar in adjacent pieces. Then I use a jointer to get perfectly square and straight edges to be glued. I apply and spread the glue on both surfaces, lay the boards on a piece of waxed paper on a perfectly flat surface (such as the bed of a table saw), and clamp the boards together (and to the flat surface to ensure the individual pieces are lying flat as they are glued). The waxed paper keeps any squeezed-out glue off my table saw and prevents gluing the boards to the flat surface.
It's important during this tracing process to keep in mind the best direction for the grain to run in each component. If two components will be complementary by virtue of their relative position, make sure they have a complementary grain orientation. An example in this project is the two arms. The top surface of each arm should have a similar grain orientation. When all the parts are traced onto the construction stock, begin cutting out the components, being very careful to cut "close to the line."
Crafting the Individual Components
Cut each piece out on the band saw, exercising great care. For parts that require a rounded edge, go ahead and smooth the sides before you apply a 1/4" round over bit on a router table to soften the rounded edges. You will be sanding these pieces to smooth their surfaces, but it's much easier to take care in the cutting out of parts than to try to sand them to the correct shape after cutting them incorrectly. On curved edges, I like to use a drum sander and for straight edges, a flat belt sander works well. I typically use progressive grits of sandpaper, progressing from 80 grit to 320 grit in the sequence 80-100-150-220-320. Don't forget to hand sand the "square" edges of the components to soften them slightly.
On the pieces that require routed dadoes, I clamp the piece to a work surface, surrounded by stock (usually scraps) of the same thickness as the piece to be routed. I then carefully measure and place a guide for the edge of the router and clamp that in place. After triple checking all clamps and positions, I set the router depth to match the depth of cut on the end of the piece that will be inserted into this specific dado. This is the small offset that will cover the rounded end of the dado groove. Only when I am certain of my positioning and clamps do I finally insert the cutter and initiate the dado. If this dado is incorrectly cut, it will require the making of a completely new piece.
Similarly, I locate, mark, re-measure, and drill and countersink all the holes where I plan to screw the parts together as I glue them.
Assembling the Chair
I assemble the chair several times during its construction before I glue it together. Only after I'm
 |
The arm is made of two layers,
glued together. |
positive the parts are properly crafted do I commit to final assembly. First, I glue the two pieces of each individual arm together. You will want to make sure both gluing surfaces are perfectly flat. Any little gap in this glue joint will be visible. This step is done before the final shaping, sanding and drilling of the arms.
The sequence I use to assemble the chair is to first assemble the two sides (rockers) with their cross brace. I glue and screw these parts together while holding them in place (not gluing them yet) in the dadoes they are to occupy on the underside of the seat. Next, I glue and screw them to the underside of the seat. I do this in two steps because it simplifies the holding and clamping of pieces during this time-sensitive process. Of course, whenever we are gluing pieces that we plan to apply finish to, we use a moderate amount of glue, spread it thoroughly on the surface being glued, and remove any squeeze-out promptly. I keep a wet rag handy just in case I get some glue on an area where I don't want it.
 |
The underside of the seat, with rockers
and cross brace installed |
After the seat assembly is completed, I install the back with glue and screws. I follow this, once everything is completely dry, with the arms. When installing the arms, it is really important that the attachment surface of the arm is tight and flush against the back. That means the large 1-1/4" dowel supporting the front of the arm must be very precisely placed. Both ends of that dowel are glued into 1/4" deep drilled recesses -- one on the underside of the arm and one on the top surface of the seat. The dowel that is used in final assembly is 3-3/4" long. I keep a piece of dowel only 3-1/2" long as a "marker" dowel. I don't drill the recess in the seat until I dry assemble the arm to the glued back with the short dowel installed temporarily in the arm. This dowel will be flush against the seat when the arm is snugged up to the back (I use two screws rather than one to hold the arm to the back). I now trace around the bottom of the marker dowel to establish the position where I want to drill my recessed socket in the seat that will receive the final dowel. I glue, but do not screw, the bottom of the support dowels during final assembly. This sequence ensures that the very visible joint where the arm meets the back is tight with no gaps.
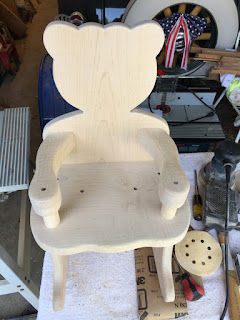 |
The assembled chair, before plugging screw recesses,
applying the nose and eyes, or finishing. |
Adding the Nose and Eyes

Any contrasting wood looks good, either light on a dark background or dark on a light background. You can siply cut the shape out of a thin sheet of wood, or, as I sometimes do, use a book matched glued sheet, with the seam centered vertically on the face of the bear. For the nose, I round off the end of a piece of 1" dowel using a belt sander. I then use wood sealer on this rounded end, and finally a couple of coats of semi-gloss black enamel. Then, I slice the nose off the dowel at a length that leaves the rounded nose slightly proud of the surrounding surface when it's glued in its recessed hole.
For the eyes, I prefer to paint the ends of the dowel stock using black and white enamel before I assemble the two dowel sections that make up each eye. After I have glued the smaller dowel into the hole in the larger dowel, I simply slice off the thickness that will be flush when installed in its recess on the back of the chair.
Finishing the Rocker
The finish you use is your personal choice. I want the rocker to last, since it's the kind of object that gets passed from child to child within a family. It will probably sustain a lot of abuse. The last rocker I built, shown below, was finished as follows:
- Three coats of a 50-50 mix of boiled linseed oil and mineral spirits, applied with a cotton rag, then wiped dry, with 0000 steel wool between coats.
- Three coats shellac, progressively thinner -- 2-lb. cut, then 1-1/2 lb. cut, then 1 lb. cut -- applied with a cotton rag very quickly to minimize streaking, then steel wooled between coats.
- One coat of Seal-A-Cell clear finish from General Finishes, applied with a rag and then wiped with a dry, lint-free cloth.
Please feel free to submit questions or suggestions in the comments section. And enjoy building a little chair for that special child.
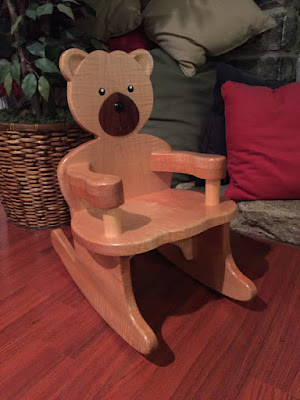 |
| The finished chair |


 I proceeded to Lowe's a few weeks ago and selected the clearest 4x4 post I could find, 6' long and pressure treated to resist the elements. This meant I'd have to find some appropriate hardware to support the base. On to Amazon! I purchased the Simpson Strong-Tie E-Z Base with its beautiful black glossy powder coated finish. A piece of hardware worthy of such a feeder.
 This required that I purchase some anchor bolts, nuts and washers. Then I dug a hole about 18" deep, drove in a half dozen pieces of reinforcement bar, built a form for the perimeter of the concrete base, and poured the concrete into which I incorporated the anchor bolts. Now things started to take shape!