Mar 25, 2013

Banjo Boys, Chapter 15

Today started out kind of dreary, with intermittent rain and even some talk of snow.  Monty decided he had other commitments that prevented his participation in today's festivities.  In fact, Monty has been working on his banjo during the past week, and had sent reports and pictures.  He has now mounted all his brackets, made his own hardware to lock the neck to the rim and installed it, and he has applied his first coat of tung oil finish to the neck.  His banjo is complete to the point of installing the head and setting it up.

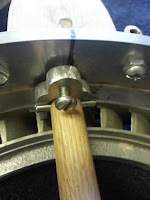
Here is the neck tensioning fitting that Monty made from an aluminum billet: 


And this picture shows it installed.


The banjo assembled with the tension hoop and neck is really beautiful.
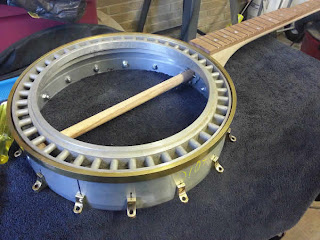
Monty's banjo is about ready
to receive its head and start being played!
Remember, you can click on any of these images to see them full-size.

So Clint and I were playing catch-up to some extent today to finish as many details as we could.  I cooked up some eggs and Mary Ann prepared bacon and sweet potato biscuits.  After a hearty Banjo Boy Breakfast, we headed to the shop.


Clint started out working on his newly-acquired hardware.  He spent about an hour polishing it prior to installation.  In the meantime, I was attempting to polish my rim.  I used progressively finer sandpaper and emery paper until I reached 1000-grade emery paper.  Then I began polishing, first by hand, then using a buffing wheel mounted in the drill press.  I'm really pleased with the results:

The polished rim turned out better than I expected!
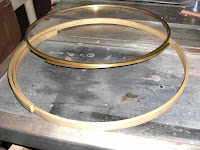
Meanwhile, Clint had turned his attention to bending his tension hoop to get it just right.  We initially formed brass stock into circles by rolling them in a rolling mill at Dan Shady's shop.  The result is a hoop that overlaps itself as shown here:

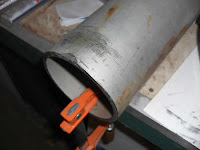
These hoops are close to circular, but not perfect.  So they have to be tweaked using a round "anvil" made from an old piece of pipe and a rubber mallet.  It's tedious and frustrating to get the hoops exactly right.  And of course, the ends must be cut off where they overlap.  On the tension ring, which will be silver soldered, the ends are cut on an angle to provide a greater surface area in the soldered joint for strength.  Here's our high-tech anvil, on loan from the Shady Boys:

One of the unpleasant discoveries I made while examining the tension hoop material and my assembled banjo is that I didn't create a large enough gap between my fretboard and the rim to accommodate the flesh hoop and the tension hoop.  I'm going to have to enlarge this opening using a chisel or some other mechanism.  This is one of those mistakes that would have been extremely easy to avoid and is going to be an enormous pain to fix...
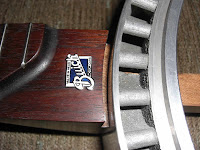
The groove that's too small for the hoop!

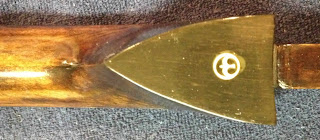
Clint had installed his steel pin that is inserted in a hole drilled through the heel cap and through the dowel rod where it extends into the neck.  This pin provides extra security to prevent the dowel rod from ever pulling loose from the neck.  He wanted to cover up the hole where this pin had been installed.  On eBay, he had acquired a tiny hat pin that looked like a bird in flight encircled by a gold rim.  This tiny jewelry item was about a quarter inch in diameter -- Just about perfect to inlay into the heel cap.  Clint plugged the hole with black-dyed epoxy, let it harden, then inlaid the tiny bird-in-flight.  Here is the result:

Sticking to his "bird" theme throughout, Clint had also acquired a brass-finished bird skull drawer pull from a craftsman on Etsy.  He fastened it to his newly-arrived dowel rod ferrule, where it shall maintain a guard over the banjo.  There's no doubt it will ward off evil spirits:


Clint sent a picture of his banjo after he got home and finished installing the hardware.  He has installed the hooks in the brackets and needs only to finish his tension hoop to be ready to make the head.  

Monty is at about the same stage, but his tension hoop is finished.  Monty still has to make his hooks from some vintage spoons that Dinah acquired for him.  And I need to finish making my brackets and get them installed, shape my tension hoop to get it silver soldered, make my hooks from the navy spoons I got on eBay, and make a head.


The Banjo Boys won't be getting together next week because I'll be away.

Mar 17, 2013

Hat Day

"Howdy, Buckaroos."
Recently, I came down with a severe case of HAS -- Hat Acquisition Syndrome.  This malady is a close cousin of GAS -- Guitar Acquisition Syndrome, which afflicts a couple of my close friends.  I have observed that when they come down with GAS, there's only one cure.  They buy a new guitar and the symptoms disappear (at least for a while; It seems to be chronic.).

I believe that in my case the HAS was brought on by a recent job assignment.  I've been working in Texas.  A lot of Texans wear hats.  Big hats.  Cowboy hats.  They brought to mind my days living in Oklahoma.  And I used to wear a type of hat that was commonly referred to as a "short horn."  Taking a cue from my GAS-afflicted pals, I decided to search for a proper hat.

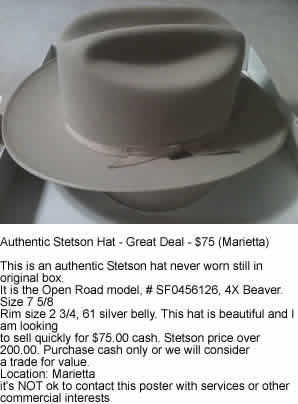
A little Googling revealed that the hat I was looking for is the Stetson "Open Road."  Think LBJ.  And a little further research told me that the hat is available in straw or felt (either a 3X beaver felt or the top-of-the-line 4X).  I'm a felt hat kind of guy.  I started looking at prices.  This is no WalMart commoner's bonnet.  For the 4X model, we're looking at over $200!!  I decided that maybe straw wasn't so bad after all.  Then I mentioned my quest to Clint, my co-worker, who happens to be a real pit bull kind of Internet searcher.

We measure my head.  I need a 7-5/8 sized hat.  Clint goes to work.  Within a few minutes he informs me of the following ad:


I mentioned it to Mary Ann and she said, "Let's go over to Marietta on Saturday.  It would be an adventure."  So, I emailed the seller who called me back.  We figured out where and when to meet.  Mary Ann and I drove to Marietta yesterday, met my new best friend, Rory, and tried on the hat.  It fit.  I paid him.  The HAS disappeared instantly.

The hat was initially purchased a few years ago at Stark & Legum men's clothing store in Norfolk, Virginia.  It was given to Rory's father, who never wore the hat.  It was still in its box with the original wrapping paper.  Rory's dad passed away a couple of years ago and Rory put it in his own closet, thinking he might wear it some day.  That day never came, so I was fortunate enough to get it.

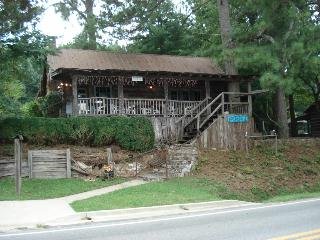
Mary Ann and I had a lovely dinner at the Moonlight Bistro in Mentone, Alabama, and got home around dark.
The Moonlight Bistro


Mar 10, 2013

Banjo Boys, Chapter 14

Clint at the end of the day with his assembled banjo!

The B-Boys met at Hardee's at 8:21 for a healthy breakfast.  After proceeding to the shop, we opened up the big door, moved Winston outside (he got a bath later in the day!), and set up shop by moving the "messy" tools outside.  We decided to help Clint get caught up, since he has missed the last couple of weeks.

During the day, Clint got his main dowel hole drilled, crafted his dowel rod from scratch, got the dowel rod glued into the heel of the neck, and removed and replaced the ebony heel cap with a thicker piece of ebony. What a day of progress.


My tuning pegs installed
Monty had brought a brand new brad-point 3/8" drill bit that we needed to drill the holes for the tuning pegs.  Both Clint and yours truly got our holes marked and drilled without incident.  The big concerns when drilling these holes are to locate them precisely and to avoid any splintering or "tear-out" of the edges of the holes.
The mounted trishield

On my banjo, I also drilled a small hole in the dowel rod for a steel pin that is part of the hardware that holds the neck firmly against the rim.  I got all the hardware mounted and it works perfectly.  I also made a small sliver of walnut that I glued on the surface of the heel cap that presses against the rim.  Because of the shape of the rim, there had been a tiny gap there that is now filled.  I also finally glued the Buick trishield emblem into its recessed cavity on the peghead.

The hardware that holds
the neck in place

Monty, in the Banjo Boy tradition of helping his fellows, assisted both Clint and me all day.  We dined at the Pizza Hut in Fayetteville.  And to top the day off, as Clint was filing his dowel rod hole in his rim, I found time to wash Winston, who had gotten pretty grungy from being outside in rain and snow over the last several weeks.


All three of us now have things that really look like banjos!
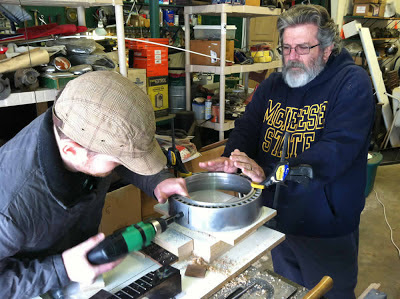
Monty assists Clint in drilling his rim using a
metal-cutting hole saw that Monty located on line

Mar 6, 2013

Delicious Island Fare...


I happen to be working in Corpus Christi, Texas.  Of course, any travel is an opportunity to try some local cuisine.  And one of my co-workers, Bob Grow, is as adventurous as I am to try new eateries.  Tonight, we hit the jackpot -- Dragonfly Restaurant and Curacao Blues.  The restaurant is at 14701 South Padre Island Drive, Corpus Christi.  The owners describe their offerings as follows: "Dragonfly provides its guests with the finest international cuisine prepared daily by owner and culinary artist, Dominique Cordier.  From our savory Escargot to our Blue Lump Crab Cake dinner, our menu of unforgettable flavor profiles are guaranteed to satisfy any craving."  I ordered the Shrimp Skewer.  It consisted of seven large gulf shrimp broiled on a skewer, with "coconut Sambal sauce," served with coconut peanut rice, soy honey salad, sweet potato plantain cake.  It was spectacular, with flavors too subtle to adequately describe.  Highly recommended.


Mar 3, 2013

Banjo Boys, Chapter 13

Winston withstands the blizzard-like conditions outside of the shop

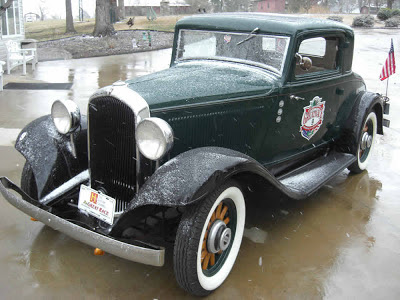
The foul weather arrived just as the weather man predicted.  Monty and I didn't let it hamper our progress.  We met for breakfast at Hardee's in Meridianville and then progressed to the shop.  As I moved Winston outside to make room to set up, I realized that the last time he was in some snow was on June 27, 2004.  On that day we hit a blizzard between Leadville and Breckenridge, Colorado, at over 10,000 feet elevation.  Conditions were less severe today.

Our first order of business was to test Monty's new drill bit to cut our 5/8" holes in both the aluminum rims and subsequently in the heel of each banjo neck.  The precision of this operation ultimately determines the alignment of the strings in relationship to the frets and to the centerline of the neck and pot.  The new bit worked perfectly!  Within about an hour, both my neck and Monty's were bored and both rims were ready to move on to the next step.  We were greatly relieved to have this step behind us.  Clint is with his family this weekend, so he still has this to look forward to.

Monty decided to start shaping his new dowel rod, made of maple, while I proceeded upstairs to begin filing out around the 5/8" hole in my rim to make it into a square opening that my dowel rod will fit into snugly.  I didn't understand why so many of the traditional banjos had square dowel rods, but I've concluded that part of the reason is to keep the neck from rocking sideways relative to the top surface of the rim -- to keep the fretted surface in transverse alignment with the head.  After Monty got his dowel rod shaped he started drilling the 16 holes around the rim where the brackets attach that help apply tension to the head.  He had made and polished the brass brackets during our last two building sessions.  My drill press was too small to accommodate the 11-5/8" diameter of the rim, so we unbolted it from my workbench and let it hang over the edge of the bench.  Then,  while I held the drill press, Monty drilled the holes.  It worked just fine, as you can see:

Here, you can see both the 5/8" hole for the dowel rod
and the smaller holes for attaching the brackets
And then, Monty proceeded to attach the brackets in sixteen locations.  Conveniently, using sixteen brackets and hooks to tension the head leaves enough space between brackets to accommodate the neck between two of them.

The inside (top image) and outside view (bottom image)
of Monty's beautiful, handmade brass brackets
Filing the square hole --
An endless process

While all the sanding and hole-drilling was going on downstairs, I spent a good part of the day hand filing the square hole needed for my dowel stick to slide through when assembling the neck to the pot.  Eventually I discovered that the tapered end of my dowel rod was slightly barrel-shaped.  I used the belt sander to straighten the surfaces.  Then I cut the length of the round dowel end to fit snugly into the heel and I glued them together, ensuring that the neck, dowel rod, and rim are all properly aligned.

The dowel rod glued
to the heel of the neck
So finally, I was able to see what the assembled banjo will look like by simply sliding the square dowel rod through the square hole into the rim:


First time assembly -- a glimpse of a completed banjo
In spite of dire predictions for bad weather, this turned into a very productive day for the Banjo Boys.  'Til next time...